Hand Cut Dovetails
Through Dovetails
P. Michael Henderson
November 11, 2010
This page, and the one on half-blind dovetails, are intended for the students in my hand cut dovetails class. The instructions here are intended to supplement the classroom instruction and, therefore, may not be sufficient for someone to learn how to make hand cut dovetails, just from these pages.
Dovetails are a woodworking skill that improves with practice. Your first dovetails will likely have a number of problems, and you may feel disappointed with what you produced. Just about everyone experiences the same thing.
But your second set of dovetails will be better than your first, and your tenth will be outstanding compared to your first. Sure, there'll still be things you'd like to do better, but even the "expert" feels the same way. Keep practicing and your dovetails will be as good as anyone's.
Dovetails are an ancient method of joinery. There are wooden relics from Egyptian tombs (about 3000BCE) that include dovetail joints. Dovetails were especially valuable to our ancestors because glue was often not used in furniture - joinery techniques, such as dovetails and pinned mortise and tenon, were relied upon, rather than glue.
Today there are many machine made joinery techniques which provide very adequate strength, especially when paired with modern glues. For example, a drawer lock router bit, plus modern glue, can create a strong bond between the front and sides of a drawer. And once set up, the material for many drawers can be processed rapidly.
Even dovetails can be created via machine, using special router bits and a dovetail jig. So why do hand cut dovetails?
First, let me ask, "Why dovetails?" rather than some other joinery technique. Many people find dovetail joinery beautiful in and of itself. The contrast between the (usually dark) wood of the front of a drawer and the light wood (perhaps maple) of the drawer sides is striking. Combining this color contrast with the geometric shape of the dovetails produces a look that is just not found with other joinery techniques.
So why hand-cut dovetails? Dovetails, especially half-blind dovetails, are excellent joinery for case construction. Most case construction is wider than most dovetail jigs so it's difficult to use a dovetail jig in case construction. Drawers in furniture, such as a bureau, are often all different heights. If a dovetail jig is used, the jig must be set up for each drawer, and setup is a time consuming process. It's often easier and faster to do the dovetails by hand.
Finally, certain dovetails can be made by hand which cannot be made by machine, and craftsmen use these dovetail shapes to show that the joinery is hand done, rather than machine made. These shapes, combined with precise fitting of the dovetails, demonstrate the woodworking mastery of the maker.
But enough discussion, let's talk about how to make through dovetails using hand tools.
These dovetails are call "through" dovetails because the tails and pins go completely through the other piece of wood. Half-blind dovetails are so called because the tails do not go through the pin board. Because they do not go through the pin board, the end grain of the tails is not visible when viewing the pin board face. The pins are visible on the tail board so the dovetails are "half-blind" - visible on one board but not the other.
The tools needed for cutting dovetails are shown and described below.
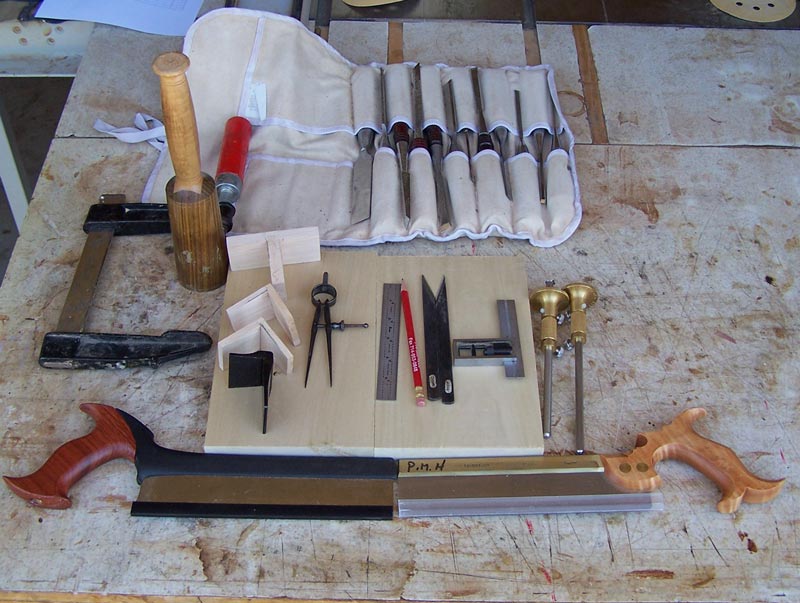
Marking gauges - I use the wheel marking gauges, but knife or pin gauges can alternately be used. In many cases for dovetails, it's nice to have two gauges.
Dovetail saw - For years, I used a small Japanese pull saw for making dovetails. When preparing for this class, I purchased dovetail saws from Lee Valley (LV) and Lie Nielsen (LN). Both work fine but the LV saw is a bit less expensive. The LV saw is 14 teeth per inch (TPI) while the LN saw is 15 TPI. LV also makes a 20 TPI dovetail saw but I find it to be a bit too slow. The teeth on a dovetail saw are filed rip instead of crosscut because you're cutting with the grain when cutting pins and tails.
Dovetail marking gauge - This is generally a saddle gauge. You can purchase one from LV or make your own. For hardwood, a 1:8 angle (about 7 degrees) works well. Some people just draw the lines for the tails by eye, but this often leads to irregular looking tails. You can also use a sliding bevel gauge set to about 7 degrees but these are a bit more work to set up and you risk the blade moving on you unless you get it good and tight. The saddle gauges are much easier to use.
Small square - For marking certain parts of the pins and tails.
Dividers - These are used for marking out the tails. There are other ways of marking out the tails but the divider technique is easy and quick. The divider technique leads to evenly spaced, equal sized tails so if that's not what you want, you'll have to research some of the other techniques. A 6" divider will work fine for dovetails, but a larger or smaller divider can also be used.
Pencil and ruler - For marking and layout.
Marking knives - I use a set (left and right) of Japanese carving knives. Many things can be used, including a small pocket knife. For very closely spaced tails, you'll need a very thin knife to mark the pins.
Chisels - These are used to chop out the waste on both the pin and tail boards. You don't need a lot of chisels - two are usually enough - but you'll appreciate having good quality chisels so that you don't have to stop and sharpen them so often. For most dovetail work, a 3/8" and a 1/4" will be all you'll need. If you start making very small pins, a 1/8" will be useful.
Mallet - I use a round carver's mallet but any mallet you're comfortable with will work fine.
Clamp - whenever you're chopping out waste, the board should be clamped down.
Soft faced mallet (not shown) - When tapping the pin and tail board together, it's nice to have a soft faced mallet. Alternately, you can put a piece of scrap wood on the tail (or pin) board and tap on that.
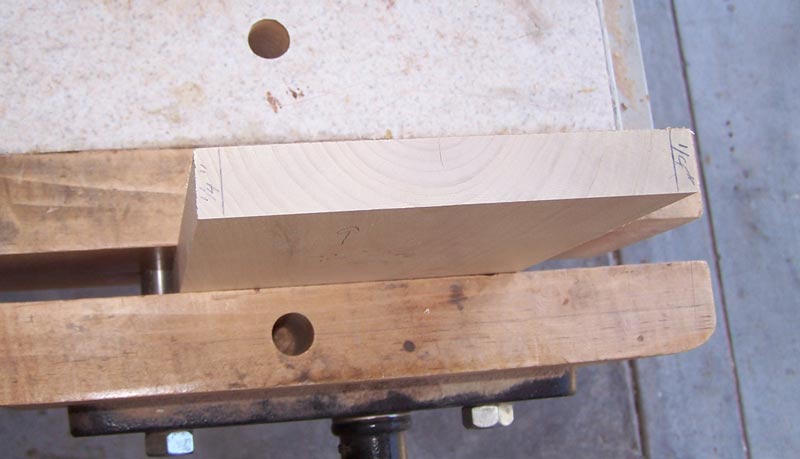
Before you begin cutting dovetails, it's very important to prepare the stock. The stock should be flat, of even thickness, and cut square on the ends - the same as you'd prepare stock for any furniture work. If your stock is not properly prepared, you'll have problems with your dovetails.
In this tutorial I'm using stock that's the same thickness on both the pin board and the tail board. But it's not necessary that the two pieces of wood be the same thickness, and often they aren't the same thickness, especially on drawers. If the two pieces of wood are not the same thickness, it's nice to have two marking gauges, one set to the thickness of each board (for through dovetails).
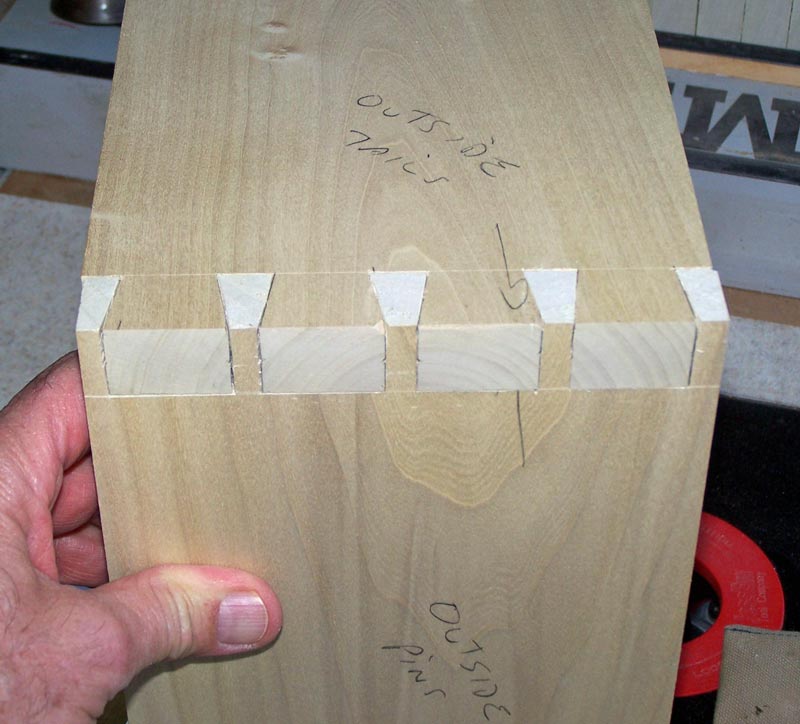
To begin, examine your boards and mark the outside of each board and mark which will be the tail board and which will be the pin board.
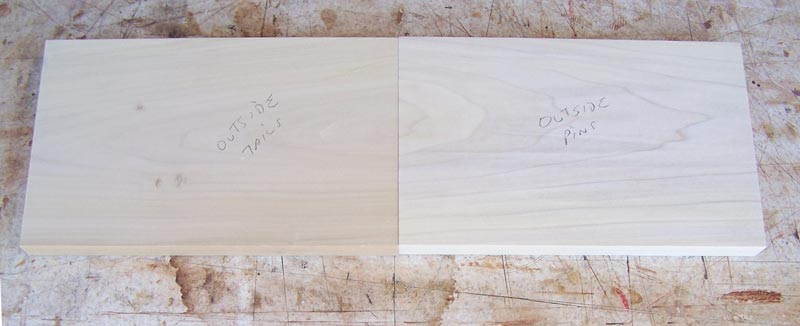
So why mark the outside? You'll cut your tails first, then use the tail board to transfer the location of the tails to the pin board. If you don't keep track of the faces of the tail board, you can mark with one side up and then try to assemble with the other side up. Needless to say, they won't fit well if you do this.
The next step is to set the marking gauge to the thickness of the boards. If the boards are not the same thickness you'll ideally need two marking gauges, one for each thickness.
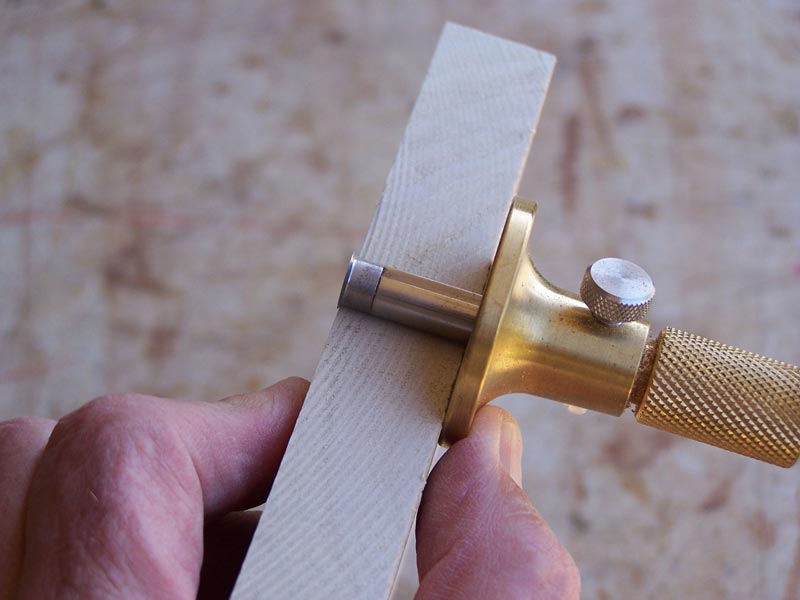
Then use the marking gauge to scribe a line one each face of both the pin and tail boards. On the tail board, also scribe the outside edges (the sides of the board).
To layout the tails, I start by marking both sides of the end of the tail board about 1/4".
I've determined that I want four tails across this board. You may want more or less. For the width of this board, four tails look decent. Three would make the tails too large, while more than four leads to too much work cutting the dovetails. Using trial and error, I start on the 1/4" line on one side and adjust the width of my dividers until I get four steps across the board. But I want the ending position to be past the 1/4" line on the other side of the board. The amount that the last step is past the 1/4" line is the spacing of the small end of the tails. If I wanted a very small space at the end of the tails, I'd go just past the line. But here, I'm going to go to the end of the board so that the spacing of the small end of the tails is about 1/4".
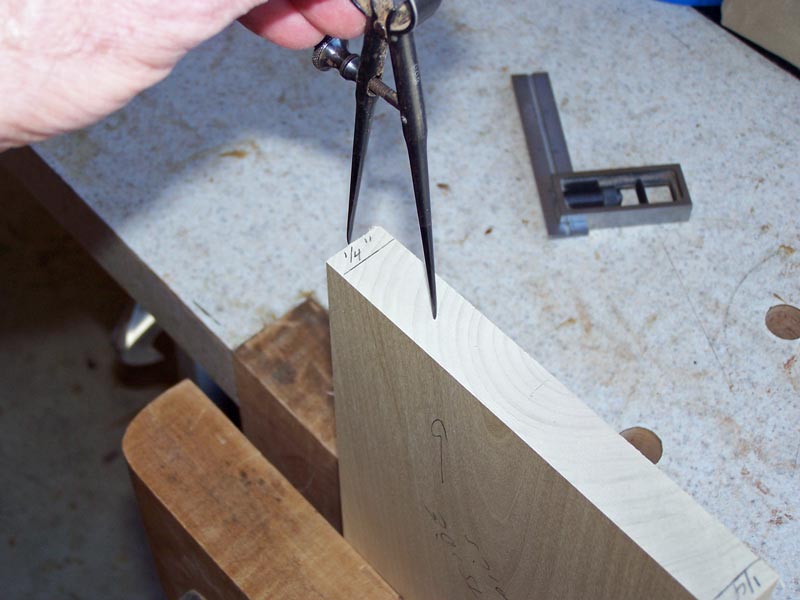
Once you get the spacing correct for the dividers, step across one more time, but this time push the divider into the wood so that you mark each landing point. Then start from the 1/4" line on the other side and so the same thing. This will give you the outline of the tails.
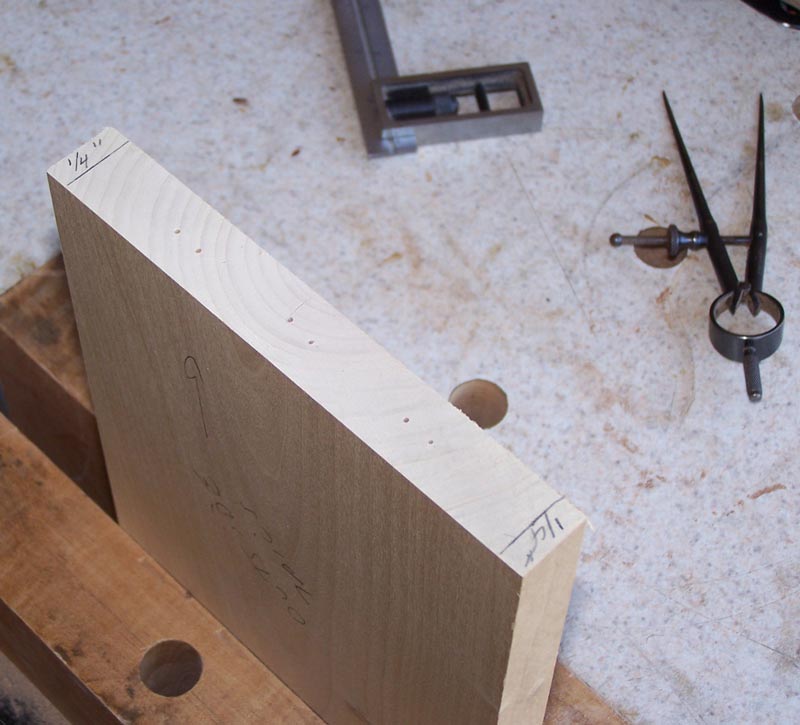
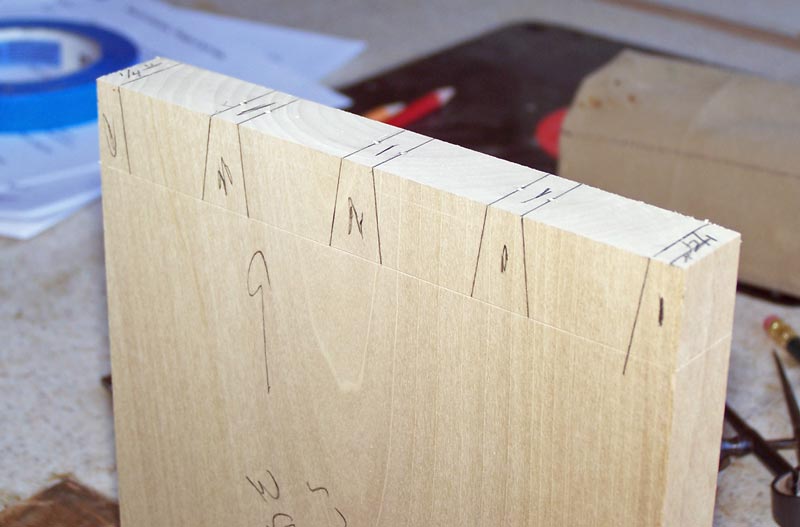
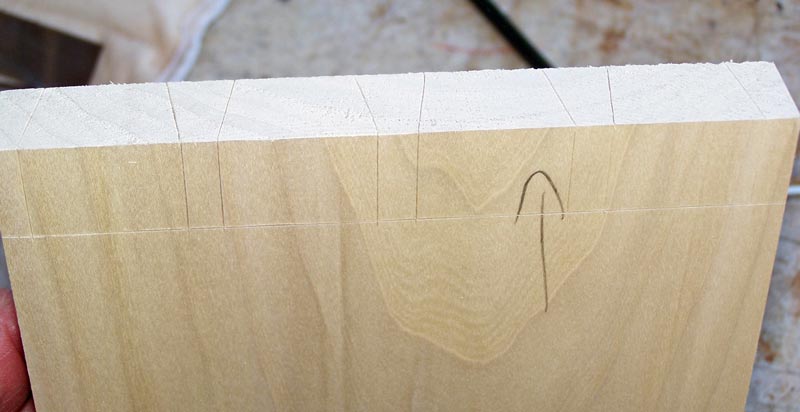
Use the small square and draw a line across the wood at each "hole".
Then, using one of the dovetail saddle markers, bring the lines down to the scribe line.
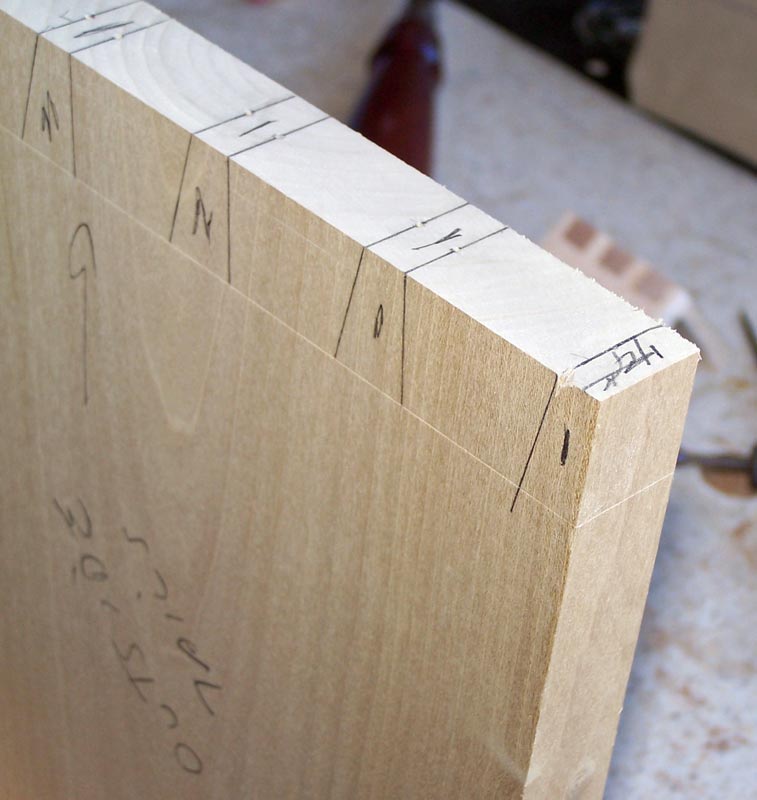
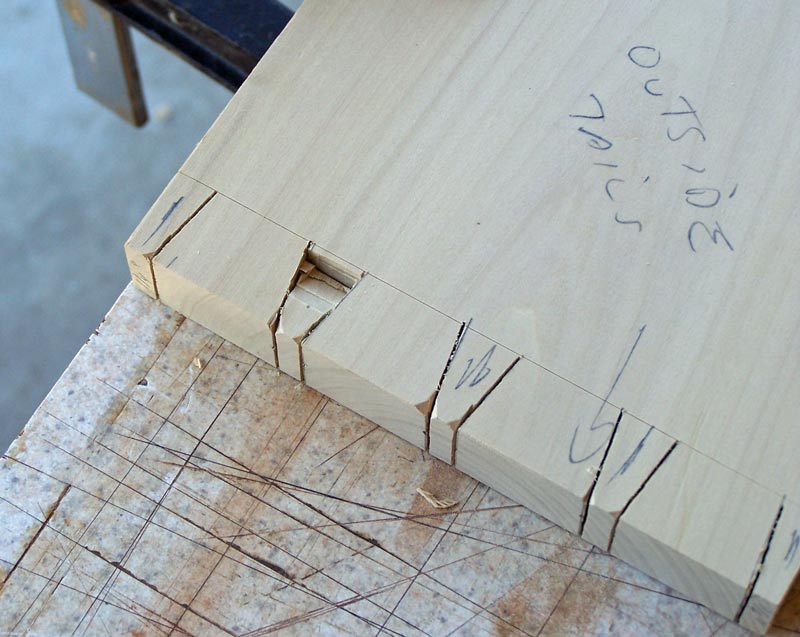
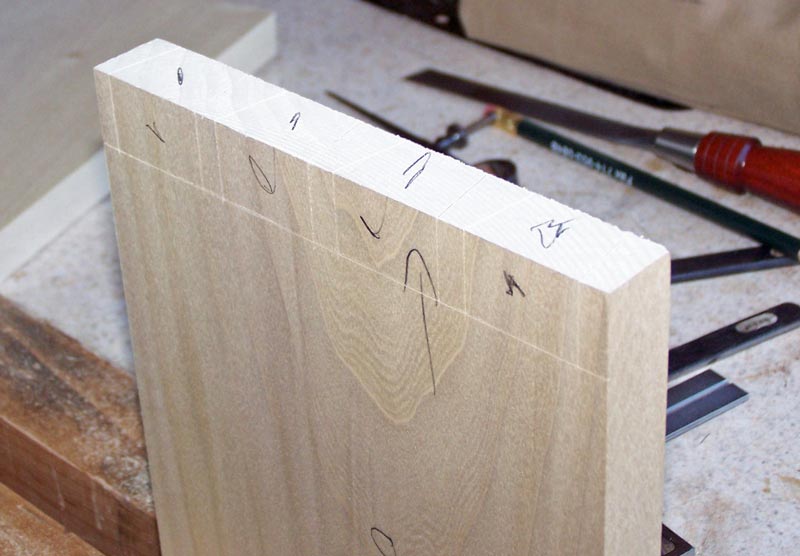
Mark both sides - you'll be able to use the lines to tell if you're sawing straight across. Once you're finished, your tail board will look like the following. Note that I've marked the waste area by scribbling a pencil mark in each waste area. You may think you'll remember what's waste and what's keep until you cut one board wrong.
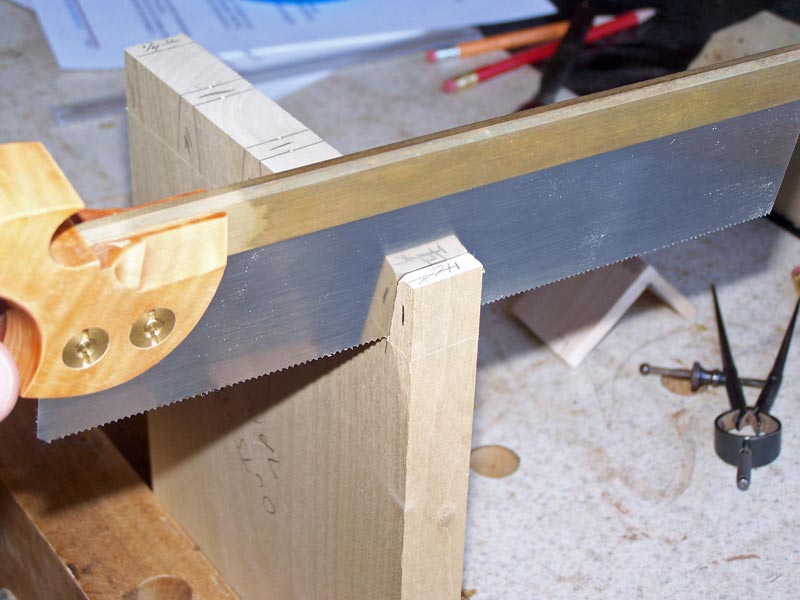
The next step is to cut along the lines. There's two ways to do this - by machine or by hand. You can walk over to your band saw and saw along the lines. That's the easy way and no one will ever know you used the band saw because the surfaces sawn will be hidden in the final joinery. If you want to do it by hand, we'll use the dovetail saw.
To help get the saw started in the right place, you can make a "V" cut at the line, with the V extending into the waste wood. It's best to have the side that will be the outside facing you when you saw. The reason is that you tend to follow the line you can see - your cut may, or may not, follow the line on the back of the board. If you cut from the show side of the board, the dovetails will look better.
Using a dovetail saw (here a Lie- Nielsen) cut along each line. It's not absolutely critical that you stay exactly on the line when cutting the tails. You're going to mark the position of the pins from the tails, so if one tail is a bit larger or smaller, the corresponding pin will be cut to fit. It is critical that the sides of the tails be straight and 90 degrees to the face of the tail board. If your cut is crooked you'll have to use a chisel to make the faces perpendicular to the face of the board.
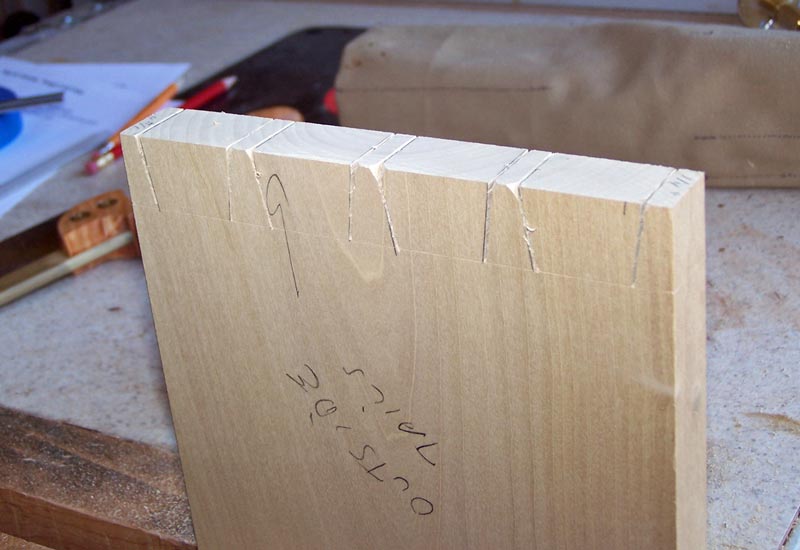
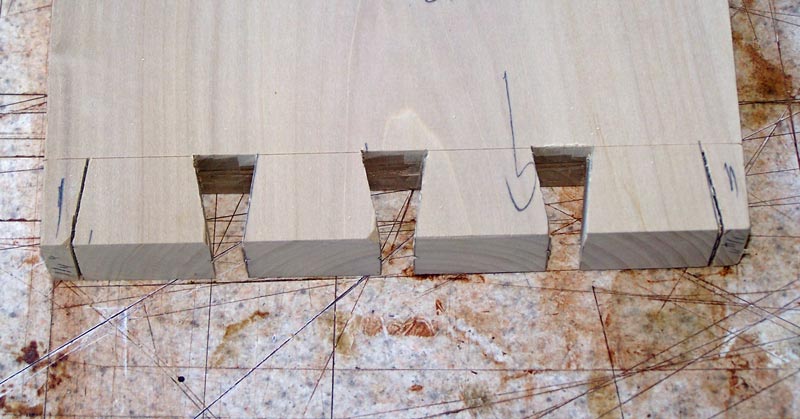
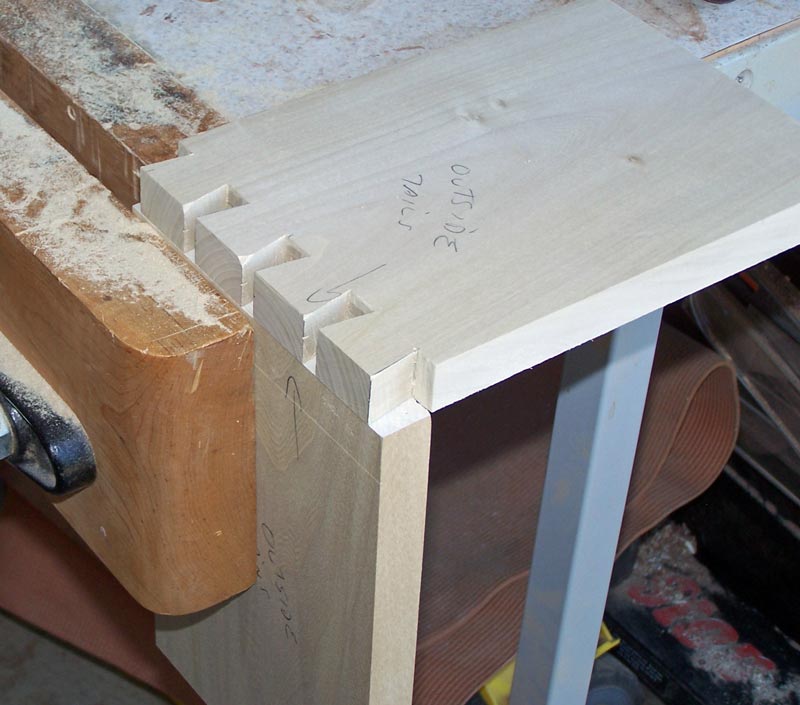
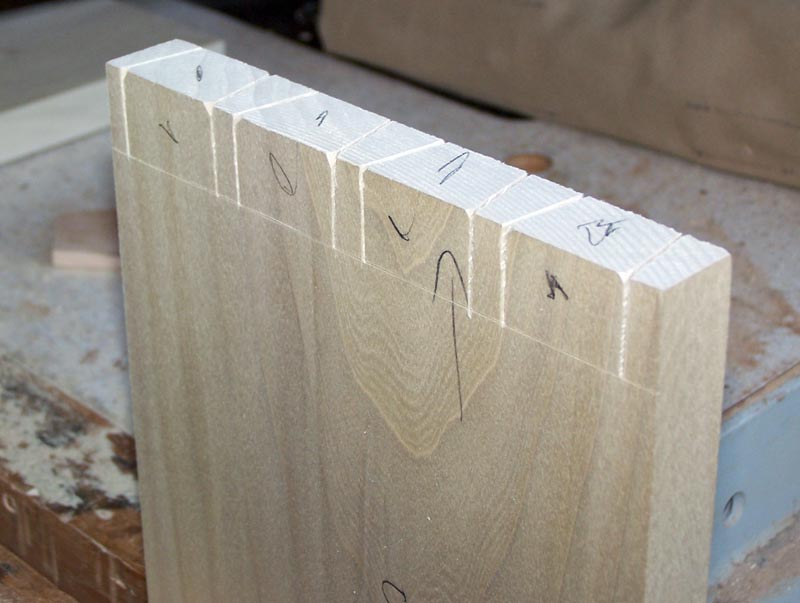
This is what the tail board will look like once you've made all the cuts.
The next step is to chop out the waste between the tails. You do not want to make your first cut directly on the score line. When a chisel is driven into wood, it has to push the wood apart. If you start on the line, the chisel will mash the wood behind the line, and the final cut will not be on the line, but behind it. Make your first cuts just a bit ahead of the score line.

Once you've chopped out enough wood, cut along the line. This time, the wood on the waste side will give way and the cut will actually be on the line.

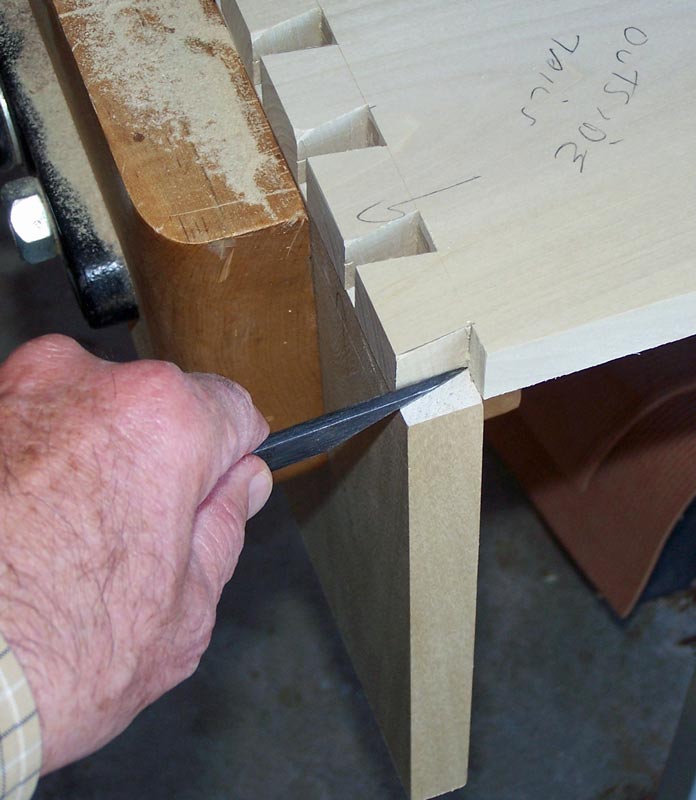
You want to chop out half the waste, then turn the board over and finish chopping out the rest of the waste. If you try to do it all from one side, you'll wind up off the line on the other side. This is what it looks like when the waste is removed between the tails.
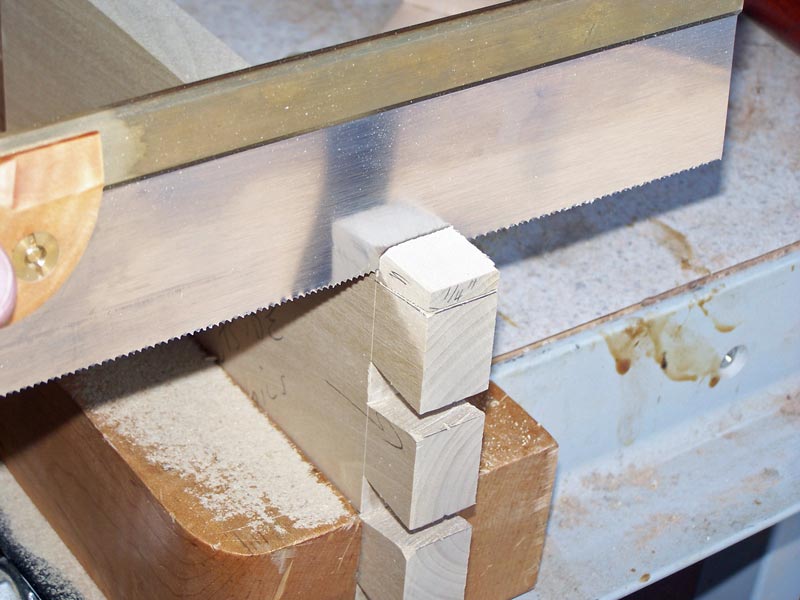
Now we need to remove the waste on the ends. You can chisel that off, but it's easier to saw it off.
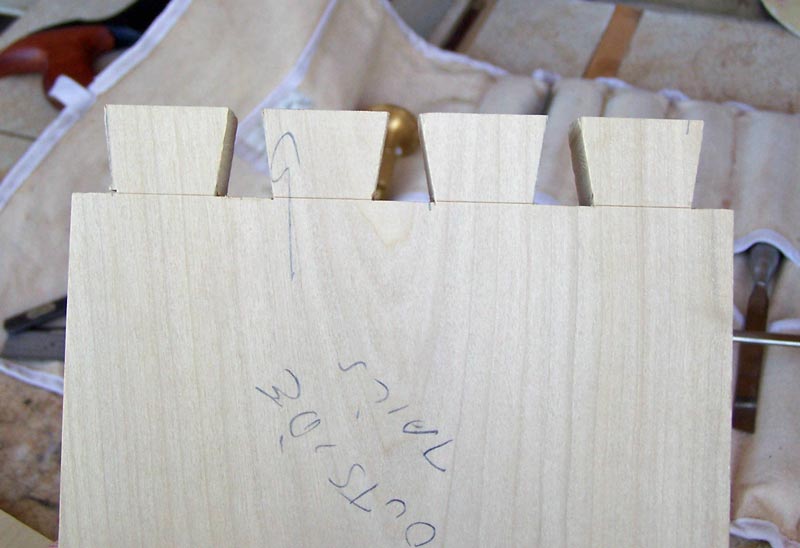
And this is what the finished tail board looks like.
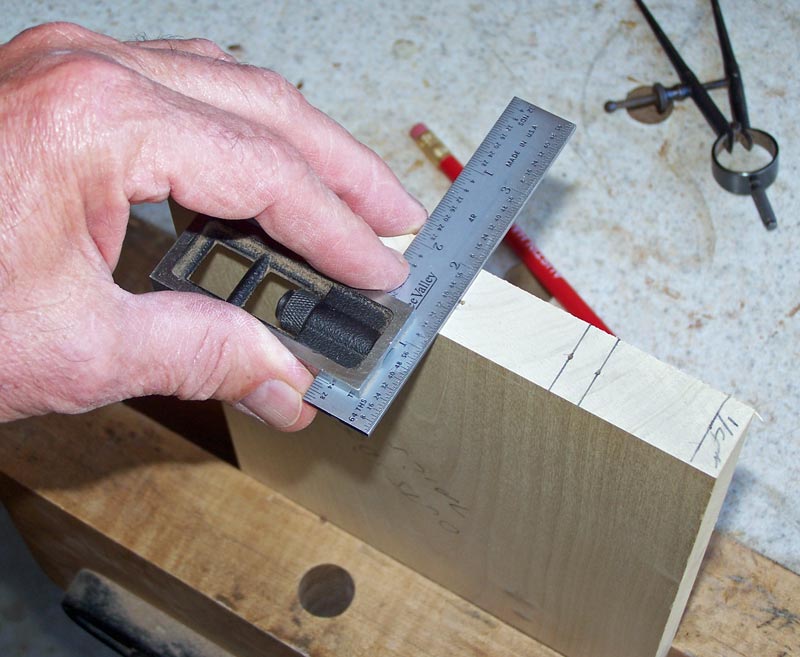
Now we need to cut the pins. The cut lines are marked from the tail board by laying the tail board on the end of the pin board and aligning the sides and ends. It's best to clamp the tail board, if possible, so it doesn't move while marking the pins.
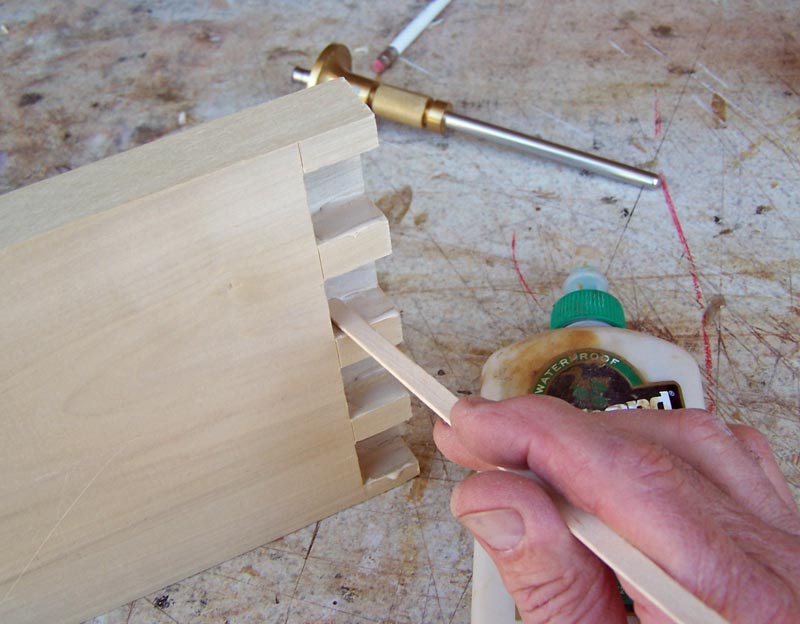
I use Japanese marking knives simply because I have them, but a regular pocket knife can also be used. Mark tight along the tails, on both sides.
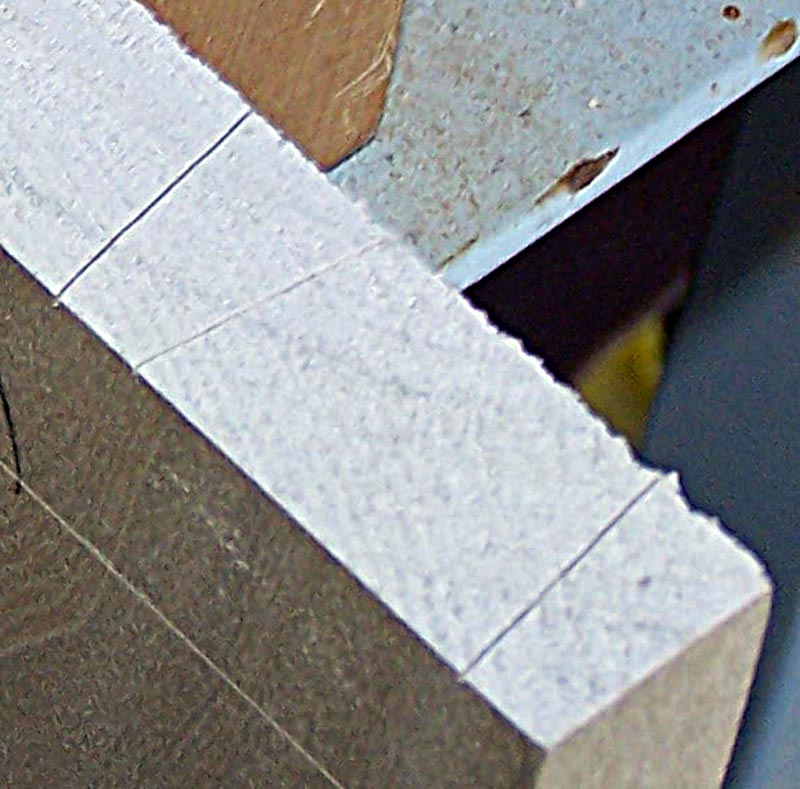
This is what the end of the pin board will look like. It's hard to see some of the marks.

Here's a close up of the marks.
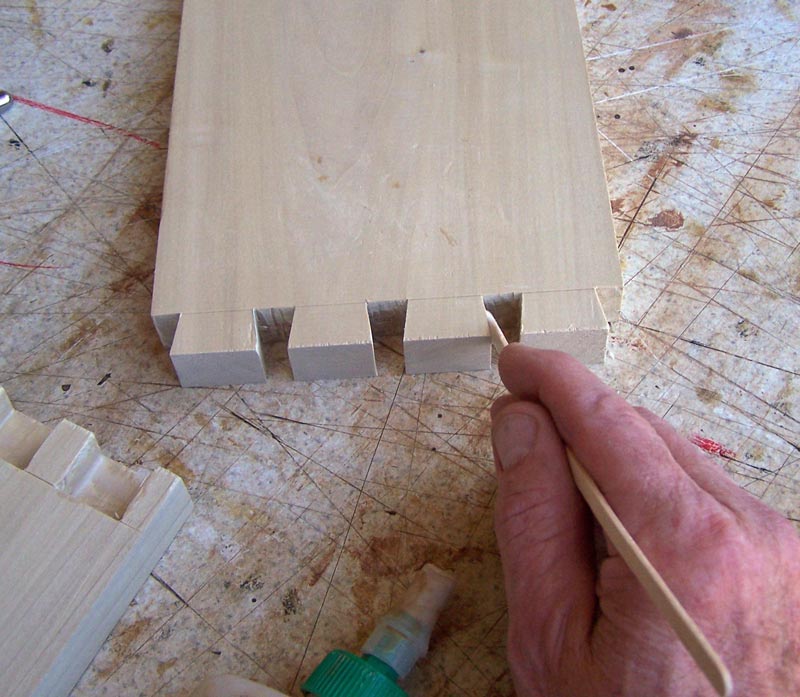
Next, bring the scribe lines directly down from the marks on the end of the board to the scribe line. Do this on both sides of the pin board.
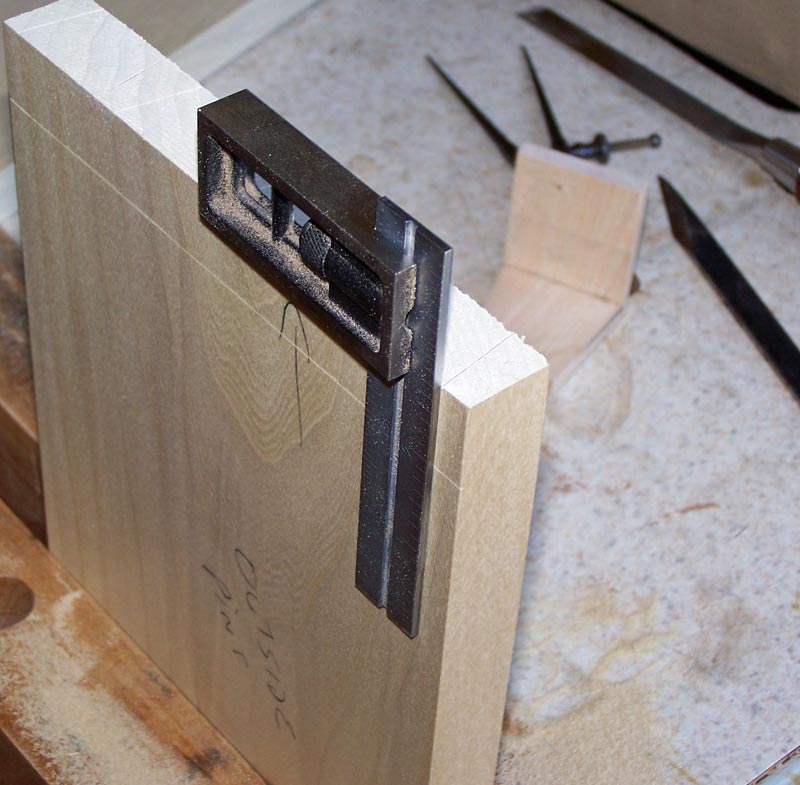
This is what the pin board will look like after you've brought the scribe lines down.
It helps to mark the waste so you don't cut on the wrong side of the line.
Use the dovetail saw and cut along each of the lines. You do not want to "split" the line. You want to be on the waste side of the line, and leave the side of the actual line.
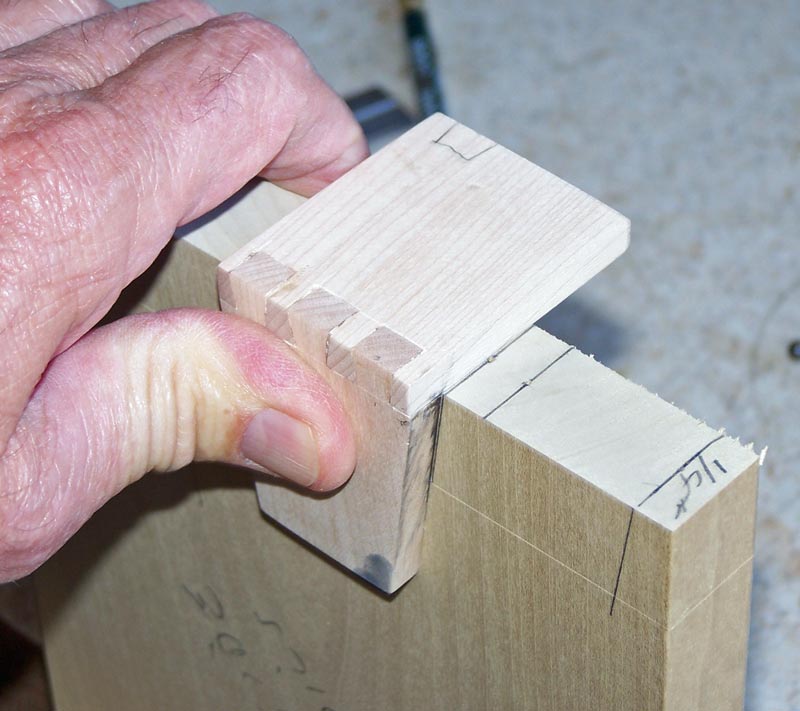
Once you've made the saw cuts, use your chisel to chop out the waste. Your pin board will look something like this.

Now, using a soft faced mallet, tap the two boards together.
And that's all there is to cutting the dovetails. Making good dovetails is a matter of practice - you'll get better and better as you make more. It helps to do a practice set of dovetails, like these, before you start cutting on your project.
Before I go on, let me discuss some issues with gluing and clamping. If you look at the surfaces of the dovetails, the only surfaces that are face-grain to face-grain are the sides of the tails mating with the sides of the pins. The other internal surfaces are end grain to face grain, which does not make a good glue joint. But that doesn't mean you shouldn't put any glue on those faces. The glue can fill small imperfections in the fit of the two boards, even if it doesn't provide much strength.
So what glue to use? There's a number of things to think about when selecting the glue. A water based glue, like PVA, can be a blessing or a curse. Because it's water based, it will cause the wood to swell, which might fill an imperfection, or it might make the joints so tight that it's difficult to get the joint together. Also, if you're gluing up a case, like the case of a bureau, there are a lot of joints and it's going to take quite a while to apply all the glue and get the case assembled and in clamps. You need a very slow glue. I often use epoxy. The West Systems epoxy with the slow hardener gives me lots of time to apply the glue, assemble the joints, and get it into clamps. Additionally, the epoxy cures hard so it fills imperfections in the joinery and makes you look like a master craftsman.
If your project is small, such as a jewelry box, PVA (for example, Titebond) works fine.
To spread the glue, I often use a coffee stirring stick (pick up a few extra next time you go to Starbucks). In the pictures below, I demonstrate applying PVA glue to the sides of the tails and pins. I'm using the half-blind dovetails for this picture but the process is the same for the through dovetails.
And to the tails.
When clamping, you have to think about how much the joinery sticks past the face of the boards, if at all. If you cut the pins and tails too long you'll have to resort to some special jigs to clamp it well. I take a piece of scrap and cut it on the bandsaw so that it only contacts the board where I want pressure. The piece of scrap looks like a bunch of teeth, where each tooth presses on a tail (or pin) to push it into the other board. I use a piece of packing tape across the teeth to keep this piece of scrap for getting glued to the project.
That's one argument for making the pins and tails exactly the right length or even a bit shorter. If you make them short, you'll have to sand the boards down to the level of the pins and tails, or use a hand plane to do the same thing.
The thing you DO NOT want do is move your clamps inward so they clamp inside the joinery. If you do that, you'll cause the boards to bow inward and they'll get glued that way.
But you do want to clamp the joints together well so that gaps get closed up and the joinery looks even better than it did in the trial fitting.
The one thing I'm ignoring here is how to fix problems in your dovetail joinery. Maybe I'll do a page on that later. In the meanwhile, if you follow the instructions here carefully, you should not have any serious mistakes to repair.
Next, I'll discuss how to do half-blind dovetails.
You can see some of my woodwork here.


 A pair of metal saw horse brackets can help you transform a couple of 2-by-4s and 1-by-3s into a sturdy saw horse, like the one shown at right. Saw the legs and crosspiece from 2-by-4s, then cut a bevel at the bottom of the legs so they will sit flat on the floor. Fit the legs into the bottom of the brackets, insert the crosspiece and spread the legs; the brackets will grip the crosspiece and stabilize the horse. Screw the brackets to the legs and crosspiece. For added stability, add braces and a stretcher. The braces are cut from 1-by-3s and screwed to the legs, making sure that the ends are flush with the outside faces of the legs. For the stretcher, cut a 1-by-3 to size and screw it between the braces.


